pinned it. did it. {with meg}
liz lamoreux

Meg is back with another awesome DIY inspired by Pinterest!
*****
I have an ever-growing board on Pinterest for DIY projects. It is full of craft ideas, up-cycled furniture, homemade headboards, and various brilliant ideas that I’ve seen and tutorials I want to try. It’s one of my favorite boards to go to when I have an itch to do a project. And one pin in particular catches my eye over and over again: diy string art.

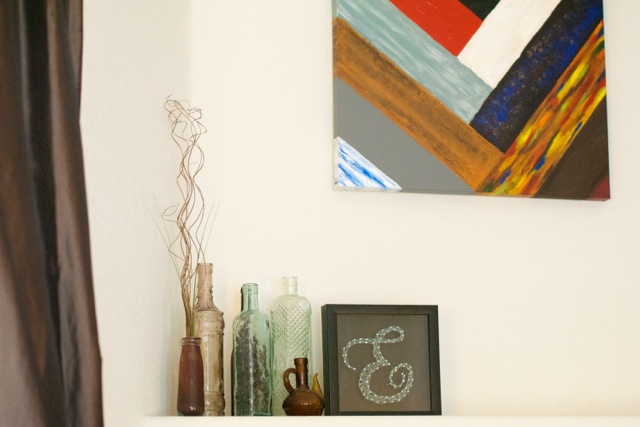
I started with a small one for our mantle above the fireplace. I decided to use a shadow box rather than just an empty frame (honestly because it was on a great sale and I liked the idea of a shadow box on the mantle). I purchased a shadow box, some teeny tiny nails, and some embroidery thread. This project cost me about $9.00 total.
I loved her original image in her post (which by the way is in German but is easily translated thanks to Google Translate) so I decided to do one as similar to it as possible. I like that it is one take on the ampersand/and symbol. I loved the curvy look so I kept it very similar. I did a freehand drawing of it on a piece of printer paper and then cut it to size. I nailed the paper to the board that came with the frame where it literally hangs from. It is like a heavy duty cardboard or a very light-weight tag board. I did struggle to keep a few of the nails in far enough, so I ended up driving them through the back and they poke through a touch. Since it doesn’t hang on the wall, it doesn’t seem to matter. I found it easiest to do my nailing on our concrete patio so I could really go for it.

Once my nails were in, I picked a random nail to start with. I tied on the string and started weaving my way in and out of the nails being careful to pull it snuggly and to create a border with the thread along the edges. When I got to the end of the thread, I tied it around a nail and cut the end closely to the nail so it doesn’t show. Put the back on the frame, and it was a completed project.

It did take a bit more time to do than I had anticipated but overall it was a very simple diy. I have a few other string art projects I am interested in doing but I think my next one will be something like this one for our bedroom.
String Art DIY Ideas
Baby/Children’s room rain cloud
Wedding/Event table numbers
United States art
Astronomy art
String Art Trophy Animals

I’m adding this project to my “I pinned it and then I did it” board with a quiet satisfaction that I can now enjoy it on my mantle and can dream up the next string project for my house. Anything you’ve done or tried that you found via Pinterest? Tell us about it in the comments below. I love hearing about the projects you are working on.
 Meg Brothers is an artist, photographer, mama, and dreamer. She loves cooking, tattoos, and sporadic dance parties in the kitchen. She prefers dark chocolate, black coffee, and flip flops when weather permits. She is a lover of Pinterest and truly believes in integrating ideas and inspiration - big or small - into normal life. Meg lives in Denver, Colorado with her husband, Dustin and son, Julian. Meg writes about photography, family, and creative inspiration at megbrothers.com. Find her on Pinterest here and on Twitter here.
***
Note from Liz: Over here in my corner, I'm trying to "use Pinterest for good." I really see it as a community of people trying to see the beauty and possibility in their lives. I'm adding a few new features here on my blog inspired by or directly about Pinterest as a way to invite others to look for this beauty within a social media community. I look forward to seeing how it all unfolds. Connect with me on Pinterest here. Read other "Pinned it. Did it." columns here.
***
 Don't forget! Join Kelly and me TOMORROW, Tuesday, July 16 at 6:30 PM PST/9:30 PM EST for a live video chat all about creative practices (what are they and our current practices), self-care, and other good things. We will also share a bit more and answer questions about the Summer Chickadee Road :: Studio Sessions and the Fall Story Excavation Retreat. Join us at 6:30 PM PST by clicking right here.
